 Skip to content
Table Of Content
Elevate Your Shopify Store’s Visual Identity and Create a Seamless Customer Journey With Expertly Integrated Custom Fonts
In the world of eCommerce, visual impact is everything. Custom fonts offer a powerful way to align your Shopify store’s typography with your brand’s unique aesthetic, fostering instant recognition and a cohesive user experience.
Shopify custom fonts and Shopify font changes are some of the useful information you’ll find here.
Our team of expert Shopify developers seamlessly integrates custom fonts, ensuring optimal performance and visual appeal.
How to Add Custom Fonts to Your Shopify Store
Our developers expertly guide you through two primary methods:
1. Utilizing Google Fonts
- Explore the extensive library of Google Fonts to find the perfect match for your brand.
- Seamlessly integrate chosen fonts into your Shopify store’s code for a quick and efficient solutions.
Google Fonts can be added to your store’s font library in a few simple steps.
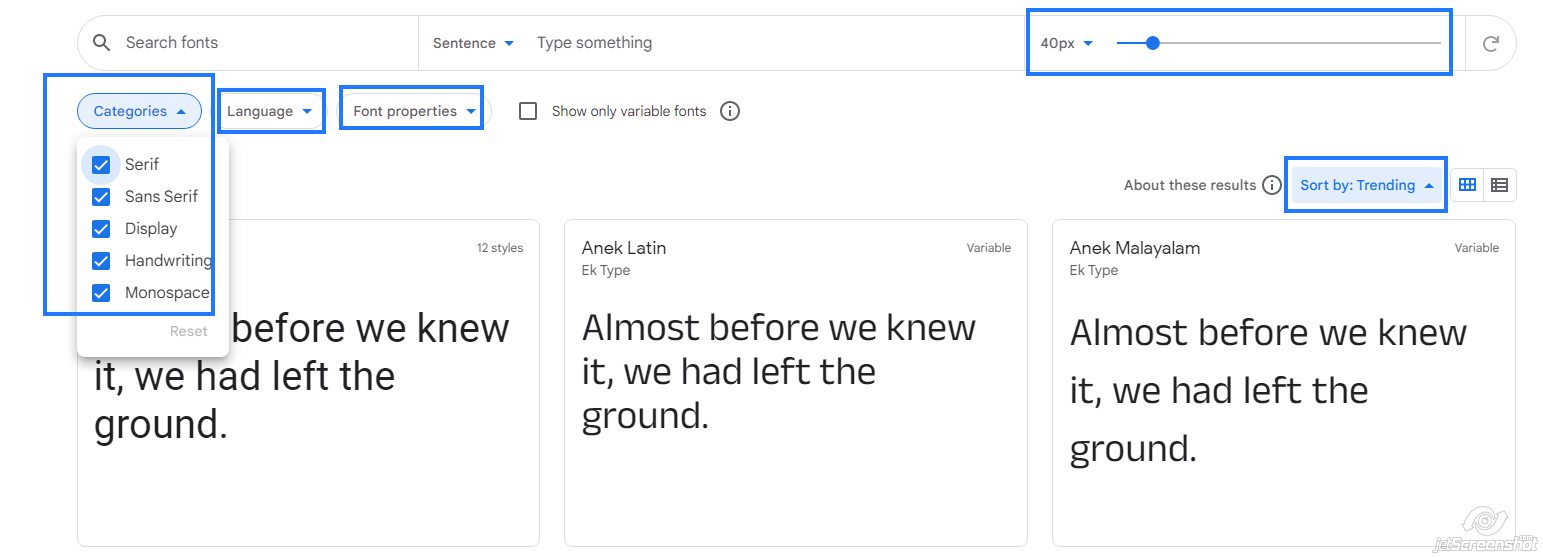
Step 1: Discover Your Ideal Font
Explore the expansive Google Fonts library, utilizing various filters like fonts, including category, language, font properties, font size, and trending options like newest, most popular, name, oldest, and trending to pinpoint the perfect typeface for your brand.
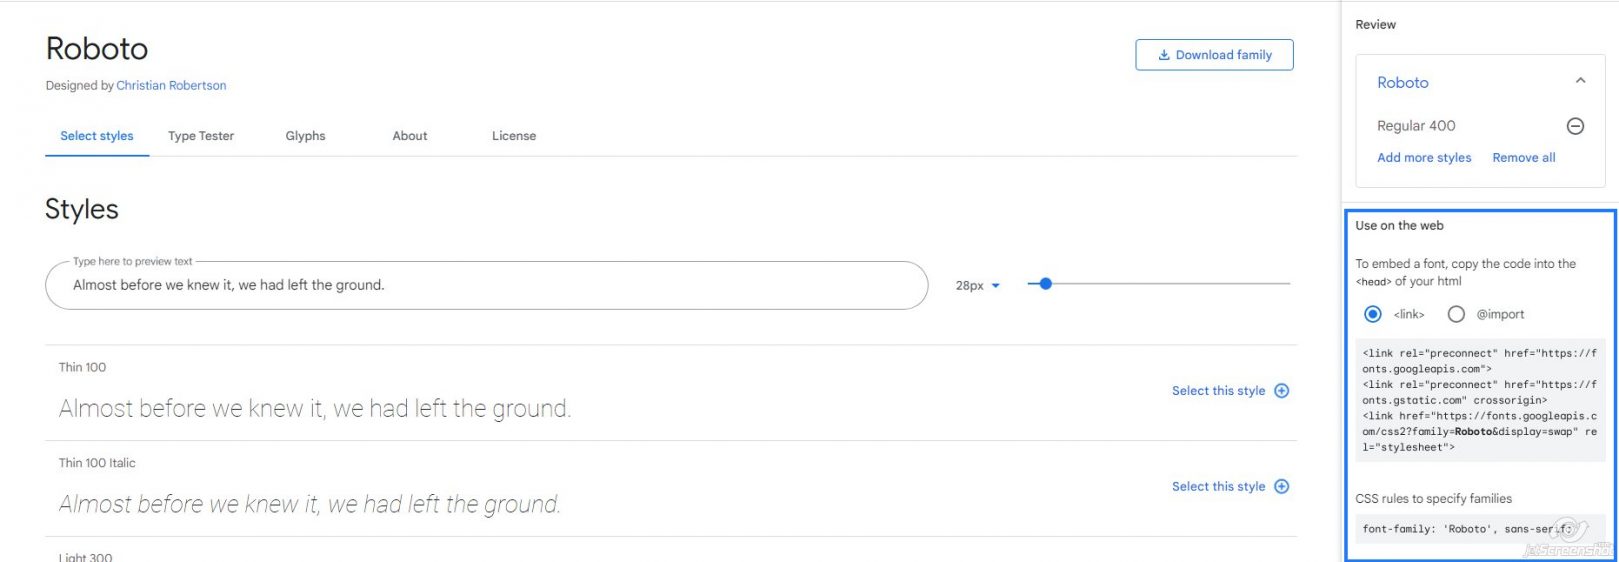
Step 2: Select and Copy Code
Finalize your font choice and size like “Roboto Regular 400” Select the font size “28px”. and effortlessly copy the provided code for seamless integration.
Step 3: Paste Code into Theme Files
Access your Shopify theme’s code editor and strategically paste the code into the <head> section of your theme.liquid file.
Align with CSS: In your theme’s style files (in the “Assets” folder), apply the corresponding CSS rule to ensure consistent font usage throughout your store.
font-family: ‘Roboto’, sans-serif;
Example Code:
<link rel="preconnect" href=" https://fonts.googleapis.com"><link rel="preconnect"href="https://fonts.gstatic.com"crossorigin><link href="https://fonts.googleapis.com/css2?family=Roboto&display=swap" rel="stylesheet">2. Implementing Third-Party Fonts
- Expand your typographic options with unique fonts from reputable third-party providers.
- Our team ensures compatibility, proper file format conversion, and strategic integration into your store's theme.
Acquire Your Font
Secure your preferred third-party font in a compatible web format, such as EOT, SVG, TTF, WOFF, or WOFF2.
To make changes to your code, navigate to Online Store > Themes > Edit Code.
Upload Font Files
Navigate to the "Assets" section of your theme editor and upload the font files for accessibility within your code.
To upload font files, click on Assets > Add New file > Upload
Insert Font Face Code
Incorporate the appropriate @font-face declaration into your theme.css.liquid file, specifying the font family name and file paths.
Example code:
@font-face Looking For Expert Shopify Development And Other Services Get In Touch
Apply Font to Text Elements
Utilize CSS rules to designate the newly integrated font for specific text elements, ensuring a cohesive visual experience.
h1,h2,h3,h4,h5,h6,.headline,.subtitle Save and Verify
Meticulously save all code changes and meticulously inspect your store's font rendering to confirm successful implementation.
Remember
- Preserve Accuracy: Maintain precision when replacing placeholders like “FONT” with your font’s actual name, including hyphens or underscores as required.
- Prioritize Compatibility: Adhere to Shopify’s best practices and prioritize cross-browser compatibility for a flawless user experience across diverse devices.
We Handle the Technicalities, You Focus on Branding
Whether you opt for Google Fonts or third-party fonts, our developers handle the entire process with precision, ensuring:
- Code Optimization: Font integration that adheres to Shopify’s best practices for optimal performance.
- Theme Compatibility: Seamless font integration within your chosen theme, maintaining a cohesive design.
- Cross-Browser Compatibility: Consistent font rendering across different browsers and devices for a flawless user experience.
Benefits of Custom Fonts
- Brand Differentiation: Stand out in a crowded marketplace with fonts that authentically reflect your brand’s personality and values.
- Improved Readability and Engagement: Enhance user experience with fonts that are both visually appealing and easy on the eyes, encouraging longer browsing sessions and increased conversions.
- Seamless Brand Integration: Maintain a consistent brand image across all digital platforms, from your website to social media and email campaigns.
Conclusion
Custom fonts are a subtle yet impactful investment in your Shopify store’s brand identity and customer experience. Our team is here to empower you with the right font choices and expert implementation, ensuring your store stands out and resonates with your target audience. Contact us today to unlock the full potential of custom fonts on your Shopify store.


